Thursday, August 16, 2012

Creating Your Own Spelling Checker Service

Posted by Satoshi Kataoka and Ken Wakasa of the Android text input engineering team


The Spelling Checker framework improves the text-input experience on Android by helping the user quickly identify and correct spelling errors. When an app uses the spelling checker framework, the user can see a red underline beneath misspelled or unrecognized words so that the user can correct mistakes instantly by choosing a suggestion from a dropdown list.


If you are an input method editor (IME) developer, the Spelling Checker framework gives you a great way to provide an even better experience for your users. You can add your own spelling checker service to your IME to provide consistent spelling error corrections from your own custom dictionary. Your spelling checker can recognize and suggest corrections for the vocabularies that are most important to your users, and if your language is not supported by the built-in spelling checker, you can provide a spelling checker for that language.


The Spelling Checker APIs let you create your own spelling checker service with minimal steps. The framework manages the interaction between your spelling checker service and a text input field. In this post we’ll give you an overview of how to implement a spelling checker service. For details, take a look at the Spelling Checker Framework API Guide.


1. Create a spelling checker service class


To create a spelling checker service, the first step is to create a spelling checker service class that extends android.service.textservice.SpellCheckerService.


For a working example of a spelling checker, you may want to take a look at the SampleSpellCheckerService class in the SpellChecker sample app, available from the Samples download package in the Android SDK.


2. Implement the required methods


Next, in your subclass of SpellCheckerService, implement the methods createSession() and onGetSuggestions(), as shown in the following code snippet:

@Override                                                                        
public Session createSession() {
return new AndroidSpellCheckerSession();
}

private static class AndroidSpellCheckerSession extends Session {
@Override
public SuggestionsInfo onGetSuggestions(TextInfo textInfo, int suggestionsLimit) {
SuggestionsInfo suggestionsInfo;
... // look up suggestions for TextInfo
return suggestionsInfo;
}
}


Note that the input argument textInfo of onGetSuggestions(TextInfo, int) contains a single word. The method returns suggestions for that word as a SuggestionsInfo object. The implementation of this method can access your custom dictionary and any utility classes for extracting and ranking suggestions.


For sentence-level checking, you can also implement onGetSuggestionsMultiple(), which accepts an array of TextInfo.


3. Register the spelling checker service in AndroidManifest.xml


In addition to implementing your subclass, you need to declare the spelling checker service in your manifest file. The declaration specifies the application, the service, and a metadata file that defines the Activity to use for controlling settings. Here’s an example:

<manifest xmlns:android="http://schemas.android.com/apk/res/android"
package="com.example.android.samplespellcheckerservice">
<application android:label="@string/app_name">
<service
android:label="@string/app_name"
android:name=".SampleSpellCheckerService"
android:permission="android.permission.BIND_TEXT_SERVICE">
<intent-filter>
<action
android:name="android.service.textservice.SpellCheckerService" />
</intent-filter>
<meta-data
android:name="android.view.textservice.scs"
android:resource="@xml/spellchecker" />
</service>
</application>
</manifest>


Notice that the service must request the permission android.permission.BIND_TEXT_SERVICE to ensure that only the system binds to the service.


4. Create a metadata XML resource file


Last, create a metadata file for your spelling checker to define the Activity to use for controlling spelling checker settings. The metadata file can also define subtypes for the spelling checker. Place the file in the location specified in the

element of the spelling checker declaration in the manifest file.


In the example below, the metadata file spellchecker.xml specifies the settings Activity as SpellCheckerSettingsActivity and includes subtypes to define the locales that the spelling checker can handle.

<spell-checker xmlns:android="http://schemas.android.com/apk/res/android"
android:label="@string/spellchecker_name"
android:settingsactivity="com.example.SpellCheckerSettingsActivity" />
<subtype
android:label="@string/subtype_generic"
android:subtypeLocale="en" />
</spell-checker>


That’s it! Your spelling checker service is now available to client applications such as your IME.


Bonus points: Add batch processing of multiple sentences


For faster, more accurate spell-checking, Android 4.1 (Jelly Bean) introduces APIs that let clients pass multiple sentences to your spelling checker at once.


To support sentence-level checking for multiple sentences in a single call, just override and implement the method onGetSentenceSuggestionsMultiple(), as shown below.

private static class AndroidSpellCheckerSession extends Session {                 
@Override
public SentenceSuggestionsInfo[] onGetSentenceSuggestionsMultiple(
TextInfo[] textInfo, int suggestionsLimit) {
SentenceSuggestionsInfo[] sentenceSuggestionsInfos;
... // look up suggestions for each TextInfo
return sentenceSuggestionsInfos
}
}


In this case, textInfo is an array of TextInfo, each of which holds a sentence. The method returns lengths and offsets of suggestions for each sentence as a SentenceSuggestionsInfo object.


Documents and samples


If you’d like to learn more about how to use the spelling checker APIs, take a look at these documents and samples:

  • Spelling Checker Framework API Guide — a developer guide covering the Spelling Checker API for clients and services.

  • SampleSpellCheckerService sample app — helps you get started with your spelling checker service.

    • You can find the app at /samples/android-15/SpellChecker/SampleSpellCheckerService in the Samples download.


  • HelloSpellChecker sample app — a basic app that uses a spelling checker.

    • You can find the app at /samples/android-15/SpellChecker/HelloSpellChecker in the Samples download.


To learn how to download sample apps for the Android SDK, see Samples.


Join the discussion on

+Android Developers


Wednesday, July 18, 2012

Getting Your App Ready for Jelly Bean and Nexus 7

[This post is by Nick Butcher, an Android engineer who notices small imperfections, and they annoy him.]


We are pleased to announce that the full SDK for Android 4.1 is now available to developers and can be downloaded through your SDK Manager. You can now develop and publish applications against API level 16 using new Jelly Bean APIs. We are also releasing SDK Tools revision 20.0.1 and NDK revision 8b containing bug fixes only.


For many people, their first taste of Jelly Bean will be on the beautiful Nexus 7. While most applications will run just fine on Nexus 7, who wants their app to be just fine? Here are some tips for optimizing your application to make the most of this device.


Screen


Giving Nexus 7 its name, is the glorious 7” screen. As developers we see this as around 600 * 960 density independent pixels and a density of tvdpi. As Dianne Hackborn has elaborated, this density might be a surprise to you but don’t panic! We actively discourage you from rushing out and creating new assets at this density; Android will scale your existing assets for you. In fact the entire Jelly Bean OS contains only a single tvdpi asset, the remainder are scaled down from hdpi assets.


To be sure the system can successfully scale your hdpi assets for tvdpi, take special care that your 9-patch images are created correctly so that they can be scaled down effectively:

  • Make sure that any stretchable regions are at least 2x2 pixels in size, else they risk disappearing when scaled down.

  • Give one pixel of extra safe space in the graphics before and after stretchable regions else interpolation during scaling may cause the color at the boundaries to change.

The 7” form factor gives you more space to present your content. You can use the sw600dp resource qualifier to provide alternative layouts for this size screen. For example your application may contain a layout for your launch activity:

res/layout/activity_home.xml
To take advantage of the extra space on the 7” screen you might provide an alternative layout:

res/layout-sw600dp/activity_home.xml
The sw600dp qualifier declares that these resources are for devices that have a screen with at least 600dp available on its smallest side.


Furthermore you might even provide a different layout for 10” tablets:

res/layout-sw720dp/activity_home.xml
This technique allows a single application to use defined switching points to respond to a device’s configuration and present an optimized layout of your content.


Similarly if you find that your phone layout works well on a 7” screen but requires slightly larger font or image sizes then you can use a single layout but specify alternative sizes in dimensions files. For example res/values/dimens.xml may contain a font size dimension:

<dimen name="text_size">18sp</dimen>
but you can specify an alternative text size for 7” tablets in res/values-sw600dp/dimens.xml:

<dimen name="text_size">32sp</dimen>
Hardware


Nexus 7 has different hardware features from most phones:

  • No telephony

  • A single front facing camera (apps requiring the android.hardware.camera feature will not be available on Nexus 7)


Be aware of which system features that you declare (or imply) are required to run your application or the Play Store will not make your application available to Nexus 7 users. Always declare hardware features that aren't critical to your app as required="false" then detect at runtime if the feature is present and progressively enhance functionality. For example if your app can use the camera but it isn’t essential to its operation, you would declare it with:

<uses-feature android:name="android.hardware.camera" 
android:required="false"/>

For more details follow Reto Meier’s Five Steps to Hardware Happiness.

Conclusion

Nexus 7 ships with Jelly Bean and its updated suite of system apps are built to take advantage of new Jelly Bean APIs. These apps are the standard against which your application will be judged — make sure that you’re keeping up!

If your application shows notifications then consider utilizing the new richer notification styles. If you are displaying immersive content then control the appearance of the system UI. If you are still using the options menu then move to the Action Bar pattern.

A lot of work has gone into making Jelly Bean buttery smooth; make sure your app is as well. If you haven’t yet opted in to hardware accelerated rendering then now is the time to implement and test this.

For more information on Android 4.1 visit the Android Developers site or join us Live.

Join the discussion on +Android Developers

Tuesday, July 10, 2012

Google I/O and Beyond

[This post is by Reto Meier, Android Developer Relations Tech Lead]


With most of the Android Developer Relations team now fully recovered from Google I/O 2012, I'm happy to announce that all of the videos for the Google I/O 2012 Android Sessions are now available!


I've included in the Google I/O 12 - The Android Sessions playlist (embedded below), as well as (in keeping with our newly redesigned developer site) in playlists for each developer category: Design, develop, and distribute.


Google I/O is always a highlight on the Android Developer Relations team's calendar; it's our best opportunity to talk directly to the Android developer community. Unfortunately I/O only happens once a year, and only a lucky few thousand can join us in person.


That's why we've been exploring more scalable approaches to interacting with developers, and with the launch of Google Developers Live, we have a way for the entire Android Developer community to view and participate in live, interactive developer-focused broadcasts all year round, and all across the world.


This week we resume our weekly interactive development Q&A Office Hours in three time zones (US, EMEA, and APAC).  We know many of you have questions related to specific I/O sessions, so we've invited all the speakers to join us, starting with this Wednesday's Android Developer Office Hours with Chet Haase, Romain Guy, Xavier Ducrohet, and Tor Norbye from the What's New in Jelly Bean and What's new in Android Developer Tools sessions.


On Friday afternoons we broadcast The Friday Review of Apps and The Friday Review of Games, two more relaxed sessions where we review self-nominated apps and games, providing feedback to the developers in the hope of discovering some feature-worthy gems.


Every Android Developer Live broadcast is recorded and available from Google Developers Live, the Android Developers YouTube channel, and directly from developer.android.com. We've also begun to make each of the Office Hours, as well as the Android sessions from Google I/O 2012, available as part of the Android Developers Live audio podcast.


We're really excited to use Google Developers Live to interact more regularly with you, the most important members of the Android ecosystem, and will be looking to expand our lineup to include regular interviews with app developers and Android engineers.


Got great ideas for how we can expand our live program? Let us know on Google+.


Thursday, June 28, 2012

Android SDK Tools, Revision 20


[This post is by Xavier Ducrohet, Tech Lead for the Android developer tools]


Along with the preview of the Android 4.1 (Jelly Bean) platform, we launched Android SDK Tools R20 and ADT 20.0.0. Here are a few things that we would like to highlight.

    Application templates: Android ADT supports a new application templates for creating new application, blank activity, master-detail flow, and custom view. These templates support the Android style guide thus making it faster and easier to build beautiful apps. More templates will be added over time.


    Tracer for GLES: With this new tool you can capture the entire sequence of OpenGL calls made by an app into a trace file on the host and replay the captured trace and display the GL state at any point in time.


    Device Monitor: To help you to easily debug your apps, all the Android debugging tools like DDMS, traceview, hierarchyviewer and Tracer for GLES are now built into one single application.

    Systrace: Improving app performance does not have to be a guesswork any more. Systrace for Jelly Bean and above lets you easily optimize your app. You can capture a slice of system activity plus additional information tagged from the Settings > Developer Options > Monitoring: Enable traces or with specific calls added to your application code.


To learn more on the layout editor, XML editing, build system & SDK Manager improvements, please read the ADT 20.0.0 and SDK Tools R20 release notes.


Join us today, June 28th, at the “What’s new in Android developer tools” session for some fun tool demos and a sneak-peak into what’s coming next.

Wednesday, June 27, 2012

Introducing Android 4.1 (Jelly Bean) preview platform, and more


[This post is by Angana Ghosh, Product Manager on the Android team]


At Google I/O today we announced the latest version of the Android platform, Android 4.1 (Jelly Bean). With Jelly Bean, we’ve made the great things about Android even better with improved system performance and enhanced user features.


Improvements include a smoother and more responsive UI across the system, a home screen that automatically adapts to fit your content, a powerful predictive keyboard, richer and more interactive notifications, larger payload sizes for Android Beam sharing and much more. For a lowdown on what’s new, head over to the Jelly Bean platform highlights.


Of course, Jelly Bean wouldn’t be complete without a healthy serving of new APIs for app developers. Here are some of the new APIs that Jelly Bean introduces:

    Expandable notifications: Android 4.1 brings a major update to the Android notifications framework. Apps can now display larger, richer notifications to users that can be expanded and collapsed with a pinch. Users can now take actions directly from the notification shade, and notifications support new types of content, including photos.

    Android Beam: In Android 4.1, Android Beam makes it easier to share images, videos, or other payloads by leveraging Bluetooth for the data transfer.

    Bi-directional text support: Android 4.1 helps you to reach more users through support for for bi-directional text in TextView and EditText elements.

    Gesture mode: New APIs for accessibility services let you handle gestures and manage accessibility focus. Now you can traverse any element on the screen using gestures, accessories, you name it.

    Media codec access: Provides low-level access to platform hardware and software codecs.

    Wi-Fi Direct service discoverability: New API provides pre-associated service discovery letting apps get more information from nearby devices about the services they support, before they attempt to connect.

    Network bandwidth management: New API provides ability to detect metered networks, including tethering to a mobile hotspot.

For a complete overview of new APIs in Jelly Bean, please read the API highlights document. Note that this is a preview of the Jelly Bean platform. While we’re still finalizing the API implementations we wanted to give developers a look at the new API to begin planning app updates. We’ll be releasing a final platform in a few weeks that you should use to build and publish applications for Android 4.1.


For Android devices with the Google Play, we launched the following at Google I/O today:

    Smart app updates: For Android 2.3, Gingerbread devices and up, when there is a new version of an app in Google Play, only the parts of the app that changed are downloaded to users’ devices. On average, a smart app update is a third the size of a full apk update. This means your users save bandwidth and battery and the best part? You don’t have to do a thing. This is automatically enabled for all apps downloaded from Google Play.

    App encryption: From Jelly Bean and forward, paid apps in Google Play are encrypted with a device-specific key before they are delivered and stored on the device. We know you work hard building your apps. We work hard to protect your investment.

    Google Cloud Messaging for Android: This is the next version of C2DM and goes back to Froyo. Getting started is easy and has a whole bunch of new APIs than C2DM has to offer. If you sign-up for GCM, you will be able to see C2DM and GCM stats in the Android developer console. Most importantly, the service is free and there are no quotas. [Learn more.]

Starting from today, over 20 Android sessions at Google I/O will deep-dive in many of these areas. Join us in-person or follow us live.

Thursday, June 21, 2012

Replying to User Reviews on Google Play

[This post is by Trevor Johns from the Android team — Tim Bray]

User reviews on Google Play are great for helping people discover quality apps and give feedback to developers and other potential app users. But what about when developers want to give feedback to their users? Sometimes a user just needs a helping hand, or perhaps a new feature has been added and the developer wants to share the good news.

That’s why we’re adding the ability for Google Play developers to respond to reviews from the Google Play Android Developer Console. Developers can gather additional information, provide guidance, and — perhaps most importantly — let users know when their feature requests have been implemented.

We’ll also notify the user who wrote the review via email that the developer has responded. Users can then contact the developer directly if additional followup is needed or update their review.

We’re releasing this feature today to those with a Top Developer badge (). And based on feedback from users and developers, we will offer it to additional Google Play developers in the future.

Conversations are meant to be two-sided, and facilitating discussion between developers and users will ultimately yield better apps, to the benefit of everyone.

Helping you build beautiful, powerful, successful apps

[This post is by Billy Rutledge, Director of Developer Relations for Android. — Tim Bray]

Just in time for Google I/O next week, the Android Developers site is stepping into a new look that is streamlined, simplified, and refocused. A developer’s tasks fall into three baskets: Designing, developing, and distributing. We're trying to make developer.android.com's organization reflect this reality, shepherding you through the app development life cycle, from start to finish.

Design

Earlier this year, we launched Android Design, an online style guide which lays out the principles, building blocks, and patterns for excellence in Android user interfaces. It seems to be working; every day, we see more and more beautiful apps arriving in Google Play. At I/O, we’ll continue to talk design, kicking off with Android Design for Success, led by Matias Duarte.

Develop

An Android app should be fast, powerful and useful. With Android Training, one of the many parts of the Develop section that we continue to build out, we lay out best practices in a variety of framework topics to help you achieve those goals. If you’re at I/O and you’re interested in Android tools, be sure to start off your show with What’s new in Android Developers’ Tools.

Distribute

The most important piece of the piece of the puzzle is about getting your app in front of millions and millions of Android users on Google Play. That’s why we added a section on distributing your app — a peek into the world of publishing and promoting your app. Chris Yerga on the Play team will be kicking off our how-to sessions on distributing your with Android apps in Google Play.

This is just a small sample of the Android sessions at Google I/O, many of which will be live-streamed so you can follow along even if you can’t make it out to San Francisco. In the meantime, we hope you find the new Android Developer site much more useful as you build great apps.


Join the discussion on

+Android Developers


Sunday, June 3, 2012

Using DialogFragments

[This post is by David Chandler, Android Developer Advocate — Tim Bray]

Honeycomb introduced Fragments to support reusing portions of UI and logic across multiple activities in an app. In parallel, the showDialog / dismissDialog methods in Activity are being deprecated in favor of DialogFragments.


In this post, I’ll show how to use DialogFragments with the v4 support library (for backward compatibility on pre-Honeycomb devices) to show a simple edit dialog and return a result to the calling Activity using an interface.
For design guidelines around Dialogs, see the Android Design site.

The Layout

Here’s the layout for the dialog in a file named fragment_edit_name.xml.

<LinearLayout xmlns:android="http://schemas.android.com/apk/res/android"
android:id="@+id/edit_name"
android:layout_width="wrap_content" android:layout_height="wrap_content"
android:layout_gravity="center" android:orientation="vertical" >

<TextView
android:id="@+id/lbl_your_name" android:text="Your name"
android:layout_width="wrap_content" android:layout_height="wrap_content" />

<EditText
android:id="@+id/txt_your_name"
android:layout_width="match_parent" android:layout_height="wrap_content"
android:inputType=”text”
android:imeOptions="actionDone" />
</LinearLayout>

Note the use of two optional attributes. In conjunction with android:inputType=”text”, android:imeOptions=”actionDone” configures the soft keyboard to show a Done key in place of the Enter key.

The Dialog Code

The dialog extends DialogFragment, and since we want backward compatibility, we’ll import it from the v4 support library. (To add the support library to an Eclipse project, right-click on the project and choose Android Tools | Add Support Library...).

import android.support.v4.app.DialogFragment;
// ...

public class EditNameDialog extends DialogFragment {

private EditText mEditText;

public EditNameDialog() {
// Empty constructor required for DialogFragment
}

@Override
public View onCreateView(LayoutInflater inflater, ViewGroup container,
Bundle savedInstanceState) {
View view = inflater.inflate(R.layout.fragment_edit_name, container);
mEditText = (EditText) view.findViewById(R.id.txt_your_name);
getDialog().setTitle("Hello");

return view;
}
}

The dialog extends DialogFragment and includes the required empty constructor. Fragments implement the onCreateView() method to actually load the view using the provided LayoutInflater.

Showing the Dialog

Now we need some code in our Activity to show the dialog. Here is a simple example that immediately shows the EditNameDialog to enter the user’s name. On completion, it shows a Toast with the entered text.

import android.support.v4.app.FragmentActivity;
import android.support.v4.app.FragmentManager;
// ...

public class FragmentDialogDemo extends FragmentActivity implements EditNameDialogListener {

@Override
public void onCreate(Bundle savedInstanceState) {
super.onCreate(savedInstanceState);
setContentView(R.layout.main);
showEditDialog();
}

private void showEditDialog() {
FragmentManager fm = getSupportFragmentManager();
EditNameDialog editNameDialog = new EditNameDialog();
editNameDialog.show(fm, "fragment_edit_name");
}

@Override
public void onFinishEditDialog(String inputText) {
Toast.makeText(this, "Hi, " + inputText, Toast.LENGTH_SHORT).show();
}
}

There are a few things to notice here. First, because we’re using the support library for backward compatibility with the Fragment API, our Activity extends FragmentActivity from the support library. Because we’re using the support library, we call getSupportFragmentManager() instead of getFragmentManager().

After loading the initial view, the activity immediately shows the EditNameDialog by calling its show() method. This allows the DialogFragment to ensure that what is happening with the Dialog and Fragment states remains consistent. By default, the back button will dismiss the dialog without any additional code.

Using the Dialog

Next, let’s enhance EditNameDialog so it can return a result string to the Activity.

import android.support.v4.app.DialogFragment;
// ...
public class EditNameDialog extends DialogFragment implements OnEditorActionListener {

public interface EditNameDialogListener {
void onFinishEditDialog(String inputText);
}

private EditText mEditText;

public EditNameDialog() {
// Empty constructor required for DialogFragment
}

@Override
public View onCreateView(LayoutInflater inflater, ViewGroup container,
Bundle savedInstanceState) {
View view = inflater.inflate(R.layout.fragment_edit_name, container);
mEditText = (EditText) view.findViewById(R.id.txt_your_name);
getDialog().setTitle("Hello");

// Show soft keyboard automatically
mEditText.requestFocus();
getDialog().getWindow().setSoftInputMode(
LayoutParams.SOFT_INPUT_STATE_VISIBLE);
mEditText.setOnEditorActionListener(this);

return view;
}

@Override
public boolean onEditorAction(TextView v, int actionId, KeyEvent event) {
if (EditorInfo.IME_ACTION_DONE == actionId) {
// Return input text to activity
EditNameDialogListener activity = (EditNameDialogListener) getActivity();
activity.onFinishEditDialog(mEditText.getText().toString());
this.dismiss();
return true;
}
return false;
}
}

For user convenience, we programmatically focus on the EditText with mEditText.requestFocus(). Alternatively, we could have used the <requestFocus/> tag in the layout XML to do this; however, in some cases it’s preferable to request focus programmatically. For example, an OnFocusChangeListener added in the Fragment’s onCreateView() method won’t get called if you request focus in the layout XML.

If the user focuses on an EditText, the soft keyboard will automatically appear. In order to force this to happen with our programmatic focus, we call getDialog().getWindow().setSoftInputMode(). Note that many Window operations you might have done previously in a Dialog can still be done in a DialogFragment, but you have to call getDialog().getWindow() instead of just getWindow(). The resulting dialog is shown on both a handset and tablet (not to scale):

The onEditorAction() method handles the callback when the user presses the Done key. It gets invoked because we’ve set an OnEditorActionListener on the EditText. It calls back to the Activity to send the entered text. To do this, EditNameDialog declares an interface EditNameDialogListener that is implemented by the Activity. This enables the dialog to be reused by many Activities. To invoke the callback method onFinishEditDialog(), it obtains a reference to the Activity which launched the dialog by calling getActivity(), which all Fragments provide, and then casts it to the interface type. In MVC architecture, this is a common pattern for allowing a view to communicate with a controller.

We can dismiss the dialog one of two ways. Here we are calling dismiss() within the Dialog class itself. It could also be called from the Activity like the show() method.

Hopefully this sheds some more light on Fragments as they relate to Dialogs. You can find the sample code in this blog post on Google Code.

References for learning more about Fragments:

Thursday, May 24, 2012

In-app Subscriptions in Google Play


[This post is by Ibrahim Elbouchikhi, Product Manager on the Google Play team. —Dirk Dougherty]


We launched In-app Billing on Google Play a year ago to give developers more ways to sell and engage users over the lifetime of their apps. Since the launch, In-app Billing has been extremely successful in helping developers monetize their apps through try-and-buy, virtual goods, upgrades, and other popular business models. Today, 23 of the 24 top-grossing apps in Google Play use In-app Billing, and the total revenue generated from in-app purchases exceeds revenue from traditional app purchases.


We’re now taking In-app Billing further by adding another important business model — subscriptions. Starting today, developers can use In-app Billing to sell monthly or annual subscriptions from inside of their apps. All subscriptions are auto-renewing, for every app and game and every type of subscription product. Developers just set the price and billing interval and Google Play manages the purchase transactions for them, just as it does for other in-app products and app purchases.


For users, Google Play provides a familiar and convenient purchase experience, highlighting subscription details such as price and billing interval before continuing with purchases. After the transaction, Google Play manages recurring billing and keeps users informed of new charges, sending them an email with each renewal. At any time, users can visit My Apps in the Play Store app to view their subscriptions and cancel any subscription as needed.


While making it easy for developers to offer a great purchasing experience, our subscriptions are also designed for flexibility. Developers can use them to monetize premium dynamic content such as journals and magazines, but they can also use them to sell access to bundled products, game levels, music and video content, value-added services, or any other digital content.


Building on Google Play’s strength as a truly cloud-connected experience, developers can offer users the ability to carry their subscriptions across multiple properties, services, or campaigns. To make this easier, we’re introducing an HTTP-based publisher API through which enterprise-scale backend servers can validate or cancel subscriptions. Using this API, for example, developers can extend access from their Android apps to their web properties, based on subscriptions that are purchased on Google Play.


In the coming days, several developers will be launching apps with Google Play subscriptions and we expect many more to follow. Glu Mobile is launching updated versions of its top Android titles, including Frontline Commando, offering subscriptions through custom VIP currency packages. "We're using Google Play subscriptions to offer consumers a compelling value and a single currency which they can use across Glu’s most popular titles” says Niccolo de Masi, CEO of Glu. “We're excited to bring these capabilities to our Android users and we believe that Google Play subscriptions will fuel further growth in our business."


If you’re a developer, you can get started with subscriptions right away by reading the In-app Billing documentation and downloading the updated sample app. If you are already using in-app billing, you’ll find that adding support for subscriptions is straightforward and involves only minor changes to your code.


You can publish your updated apps and subscription products as soon as you are ready. We’ve already rolled out client support to most Android devices worldwide, so any user with Google Play 3.5 or higher installed can buy subscriptions starting today.


We’re looking forward to seeing how you use subscriptions in your apps!


Join the discussion on

+Android Developers


Friday, April 13, 2012

Android C2DM — Client Login key expiration

[This post is by Francesco Nerieri, engineering team lead for C2DM — Tim Bray]

In the upcoming weeks, some of the older Client Login authentication keys will expire. If you generated the token you’re currently using to authenticate with the C2DM servers before October 2011, it will stop working.

If the response from the C2DM servers contains an Update-Client-Auth header, you’ll need to replace the current token with the one included in the header.

  // Check for updated token header
String updatedAuthToken = conn.getHeaderField(UPDATE_CLIENT_AUTH);
if (updatedAuthToken != null && !authToken.equals(updatedAuthToken)) {
log.info("Got updated auth token from datamessaging servers: " +
updatedAuthToken);
serverConfig.updateToken(updatedAuthToken);
}

We suggest that you start using the Update-Client-Auth response header to update tokens regularly, as keys will expire periodically from now on. For example, have a look at the Chrome to Phone service hosted on code.google.com; this code takes care of authenticating via Client Login and then sending a message:

Alternatively, you can manually generate a new Client Login token now and replace the one currently in use. ClientLogin can be used with any application that can make an HTTPS POST request. The POST request should be structured as a form post with the default encoding application/x-www-form-urlencoded, like this:

POST /accounts/ClientLogin HTTP/1.0
Content-type: application/x-www-form-urlencoded

accountType=GOOGLE&Email=johndoe@gmail.com&Passwd=north23AZ&service=ac2dm

If the POST succeeds, the response contains the authorization token, labeled "Auth", which is your new token. You could even do this from the command line:

curl -d \
"accountType=HOSTED_OR_GOOGLE&Email=johndoe@gmail.com&Passwd=north23AZ&service=ac2dm" \
https://www.google.com/accounts/ClientLogin | \
grep Auth

If your request fails or if you are prompted for captchas, please read ClientLogin for Installed Applications. And of course, if you updated your code to use the Update-Client-Auth header after the keys had expired, then you will first need to manually generate a new token.

Have fun with C2DM!

Thursday, April 12, 2012

New Seller Countries in Google Play

Over the past year we’ve been working to expand the list of countries and currencies from which Android developers can sell their products. Starting today, developers in Czech Republic, Israel, Poland, and Mexico can sell priced applications and in-app products on Google Play, using their local bank accounts for payments. Welcome developers!


If you develop Android apps in one of the new countries and want to get started selling them, visit play.google.com/apps/publish and set up a new Google Play developer account. Once you’ve uploaded your apps, you can price them in any available buyer currencies, publish, and then receive payouts and financial data in your local currency.


If you are based in Israel or Mexico and are currently selling apps through an AdSense merchant account, you will need to migrate your apps to a new Google Play developer account in your local currency. Watch for an email that provides complete information on the migration process and timeline.


Additionally, we encourage developers everywhere to visit the Developer Console as soon as possible to set prices for their products in the currencies of these new countries. Stay tuned for more announcements soon as we continue to roll out our new billing infrastructure to buyers and sellers throughout the world.


Join the discussion on

+Android Developers


Tuesday, April 10, 2012

Accessibility: Are You Serving All Your Users?

[This post is by Joe Fernandez, a technical writer for developer.android.com who cares about accessibility and usability. — Tim Bray.]

We recently published some new resources to help developers make their Android applications more accessible:

“But,” you may be thinking, “What is accessibility, exactly? Why should I make it a priority? How do I do it? And most importantly, how do I spell it?” All good questions. Let’s hit some of the key points.


Accessibility is about making sure that Android users who have limited vision or other physical impairments can use your application just as well as all those folks in line at the supermarket checking email on their phones.
It’s also about the Mom over in the produce section whose kids are driving her to distraction, and really needs to see that critical notification your application is trying to deliver. It’s also about you, in the future; Is your eyesight getting better over time? How about that hand-eye coordination?

When it comes down to it, making an application accessible is about having a deep commitment to usability, getting the details right and delighting your users. It also means stepping into new territory and getting a different perspective on your application. Try it out: Open up an application you developed (or your all-time favorite app), then close your eyes and try to complete a task. No peeking! A little challenging, right?

How Android Enables Accessibility

One of main ways that Android enables accessibility is by allowing users to hear spoken feedback that announces the content of user interface components as they interact with applications. This spoken feedback is provided by an accessibility service called TalkBack, which is available for free on Google Play and has become a standard component of recent Android releases.

Now enable TalkBack, and try that eyes-closed experiment again. Being able to hear your application’s interface probably makes this experiment a little easier, but it’s still challenging. This type of interaction is how many folks with limited vision use their Android devices every day. The spoken feedback works because all the user interface components provided by the Android framework are built so they can provide descriptions of themselves to accessibility services like TalkBack.

Another key element of accessibility on Android devices is the ability to use alternative navigation. Many users prefer directional controllers such as D-pads, trackballs or keyboard arrows because it allows them to make discrete, predictable movements through a user interface. You can try out directional control with your apps using the virtual keyboard in the Android emulator or by installing and enabling the Eyes-Free Keyboard on your device. Android enables this type of navigation by default, but you, as a developer, may need to take a few steps to make sure users can effectively navigate your app this way.

How to Make Your Application Accessible

It would be great to be able to give you a standard recipe for accessibility, but the truth of the matter is that the right answer depends on the design and functionality of your application. Here are some key steps for ensuring that your application is accessible:

  1. Task flows: Design well-defined, clear task flows with minimal navigation steps, especially for major user tasks, and make sure those tasks are navigable via focus controls (see item 4).


  2. Action target size: Make sure buttons and selectable areas are of sufficient size for users to easily touch them, especially for critical actions. How big? We recommend that touch targets be 48dp (roughly 9mm) or larger.

  3. Label user interface controls: Label user interface components that do not have visible text, especially ImageButton, ImageView, and EditText components. Use the android:contentDescription XML layout attribute or setContentDescription() to provide this information for accessibility services.


  4. Enable focus-based navigation: Make sure users can navigate your screen layouts using hardware-based or software directional controls (D-pads, trackballs and keyboards). In a few cases, you may need to make UI components focusable or change the focus order to be more logical.


  5. Use framework-provided controls: Use Android's built-in user interface controls whenever possible, as these components provide accessibility support by default.


  6. Custom view controls: If you build custom interface controls for your application, implement accessibility interfaces for your custom views and provide text labels for the controls.


  7. Test: Checking off the items on this list doesn’t guarantee your app is accessible. Test accessibility by attempting to navigate your application using directional controls, and also try eyes free navigation with the TalkBack service enabled.


Here’s an example of implementing some basic accessibility features for an ImageButton inside an XML layout:

<ImageButton
android:id="@+id/add_note_button"
android:src="@drawable/add_note_image"
android:contentDescription="@string/add_note_description"/>

Notice that we’ve added a content description that accessibility services can use to provide an audible explanation of the button. Users can navigate to this button and activate it with directional controls, because ImageButton objects are focusable by default (so you don’t have to include the android:focusable="true" attribute).

The good news is that, in most cases, implementing accessibility isn’t about radically restructuring your application, but rather working through the subtle details of accessibility. Making sure your application is accessible is an opportunity to look at your app from a different perspective, improve the overall quality of your app and ensure that all your users have a great experience.

Monday, April 9, 2012

A Faster Emulator with Better Hardware Support

[This post is by Xavier Ducrohet and Reto Meier of the Android engineering team. — Tim Bray.]

The Android emulator is a key tool for Android developers in building and testing their apps. As the power and diversity of Android devices has grown quickly, it’s been hard for the emulator keep pace.

Today we’re thrilled to announce several significant improvements to the emulator, including a dramatic performance upgrade and support for a broader range of hardware features, notably sensors and multi-finger input.

Added GPU Support

The system image we’re shipping today has built-in GPU support (Android 4.0.3 r2). With Android’s growing reliance on using the GPU to improve performance, the difference is significant. In the video below, the emulator is still interpreting ARM instructions; the performance boost is the effect of putting the GPU to work.


As a bonus, since we’re now supporting OpenGL ES 2.0, your OpenGL games can now run inside the emulator.

Please note that there are a lot of GPUs out there, and we haven’t tested all of them for this beta release, so let us know if you have feedback or encounter issues.

More Hardware Feature Emulation

The hardware features of mobile devices are a significant part of what makes them a unique platform for development, so we’re also pleased to announce that in addition to the camera support we added last year, it’s now possible to use a tethered Android device to supply inputs for sensors and multi-touch input.

We’re working on providing emulator support for more hardware features including Bluetooth and NFC.

Improved CPU Performance

We’ve also improved the CPU performance of the Android emulator. Hardware floating point operation has been available for system images since Ice Cream Sandwich (Android 4.0), allowing CPU operations to be emulated roughly twice as quickly.

Last week’s r17 developer tools release included x86 system images and host drivers (available through the SDK Manager), allowing the emulator to access the host CPU natively and offer significantly faster execution.

This video shows a CPU-bound application on two emulators running the same system image, one with virtualization, one without.

Building a modern emulator

Because the Android platform allows deep interaction between applications, and with system components, we need to provide an emulator with a complete system image. Our emulator virtualizes a complete device: hardware, kernel, low-level system libraries, and app framework.

Of course, the system being emulated typically has an ARM CPU; historically, we’d been emulating those instructions in software, and that worked OK until the advent of tablet support with additional animations and complexity in Android 3.0.

The missing pieces were the completion of Android x86 support, and the GPU support in last week’s release of SDK Tools r17. This works by funneling the OpenGL ES 2.0 instructions from the emulator to the host OS, converted to standard OpenGL 2.0, and running natively on the host GPU.

Conclusion

The Android ecosystem has a lot of devices in many different form factors. Developers need a good way of testing these apps without having to own everything out there and a fast, rich Android emulator is immensely helpful.

We hope that these new improvements will make the emulator a more useful tool in your development and testing, and look forward to improving it further for you.

Tuesday, April 3, 2012

The Gmail Public Labels API

[This post is by Nadav Aharony, a product manager on the Android team — Tim Bray]

We’re rolling out new developer features for the Gmail Android app: It now includes a public ContentProvider that you can use to retrieve label data. You can use this to access up-to-date unread counts for specific accounts’ inboxes and labels.

To use the API, the Gmail app needs to be at version 2.3.6 or higher on Froyo or Gingerbread; 4.0.5 or higher on Honeycomb and ICS. Before using it, be sure you first check the Gmail app version; we’ve provided a handy GmailContract.canReadLabels(Context) method to help with this. Your app will need the com.google.android.gm.permission.READ_CONTENT_PROVIDER permission.

Finding the Gmail accounts set up on the device

The Labels API needs a valid Gmail account to build a query for per-label information. Assuming the GET_ACCOUNTS permission, the AccountManager can be used to fetch this information:

// Get the account list, and pick the first one
final String ACCOUNT_TYPE_GOOGLE = "com.google";
final String[] FEATURES_MAIL = {
"service_mail"
};
AccountManager.get(this).getAccountsByTypeAndFeatures(ACCOUNT_TYPE_GOOGLE, FEATURES_MAIL,
new AccountManagerCallback() {
@Override
public void run(AccountManagerFuture future) {
Account[] accounts = null;
try {
accounts = future.getResult();
if (accounts != null && accounts.length > 0) {
String selectedAccount = accounts[0].name;
queryLabels(selectedAccount);
}

} catch (OperationCanceledException oce) {
// TODO: handle exception
} catch (IOException ioe) {
// TODO: handle exception
} catch (AuthenticatorException ae) {
// TODO: handle exception
}
}
}, null /* handler */);

Getting and accessing existing labels

Once you’ve got the email account, you can get a ContentProvider URI to query against. We've provided a simple support class called GmailContract.java for constructing the URI and defining the columns and relevant constants.

You can access any label, predefined or user-defined. The predefined labels include (you have to use symbolic constants rather than these strings, see below):

  • Priority Inbox

  • Starred

  • Chats

  • Sent

  • Drafts

  • All mail

  • Spam

  • Trash

To obtain a Cursor with information for all labels in an account, your app can either query this URI directly or use a CursorLoader. Here’s an example:

Cursor c = 
getContentResolver().query(GmailContract.Labels.getLabelsUri(selectedAccount),
null, null, null, null);

You can query and watch for changes on a single label by storing the URI value in the GmailContract.Labels.URI column from the cursor data.

The NAME value for pre-defined labels can vary by locale, so don’t use GmailContract.Labels.NAME. Instead, identify pre-defined labels like Inbox, Sent or Drafts using the String value in the GmailContract.Labels.CANONICAL_NAME column. Here’s an example:

// loop through the cursor and find the Inbox
if (c != null) {
final String inboxCanonicalName = GmailContract.Labels.LabelCanonicalName.CANONICAL_NAME_INBOX;
final int canonicalNameIndex = c.getColumnIndexOrThrow(GmailContract.Labels.CANONICAL_NAME);
while (c.moveToNext()) {
if (inboxCanonicalName.equals(c.getString(canonicalNameIndex))) {
// this row corresponds to the Inbox
}
}
}

If you choose to use a CursorLoader, it will keep the label counts up to date as they change over time.

Sample App

You can find a sample app that makes use of the new API here. The app provides a basic readout of label and message-count information.

People care about their incoming mail; we’re looking forward to seeing what you do with access to this information. We’re also open to suggestions as to how to improve and extend this new API.

Thursday, March 29, 2012

Making the Android Developer Console work for your whole team

[This post is by Ellie Powers, a product manager on the Google Play team. — Tim Bray]

As your apps have gotten more successful, more people have joined your team. Today, we’re making it easier to work together on analyzing and managing your published Android apps. Sharing passwords is generally a bad idea; so as of now, there’s no need to do that for the Android Developer Console — everyone can use his or her own Google account.


The account that you use today to sign into the Android Developer Console will become the account owner; only the account owner can manage access to the Console. The account owner can email an invitation to anyone; when they accept it, they’ll need to use a Google account to sign in.


Different people in your team do different jobs, so when you invite someone to your Android Developer Console, you’ll be able to specify what access they need. Today, you can limit access per-user to financial reports. In the future, we’ll give you more fine-grained control over access to the Console. For details, see Account owner and user access.


We hope this helps your team collaborate more easily. If you have any issues, feel free to get in touch via the Developer Help Center.


Join the discussion on

+Android Developers


Thursday, March 22, 2012

New Sales Reports on Google Play


[This post is by Debashish Chatterjee, Krishna Atkuru, and Ellie Powers of the Google Play Publisher Site team. —Dirk Dougherty]


For app publishers, complete and timely sales reporting is incredibly useful for managing a business on Google Play. Today we are introducing a new financial tool — Estimated Sales Reports — to give you visibility over ongoing product sales and help you support customers between payout cycles.


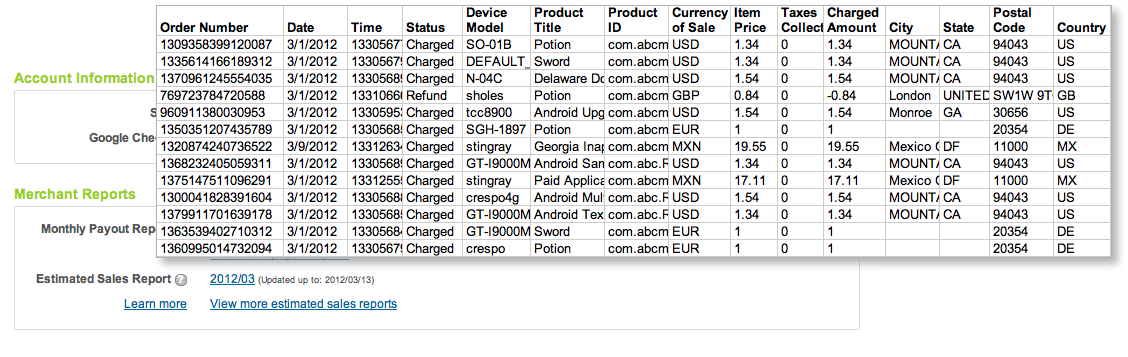
The new sales reports show you complete transaction details of recent sales and refunds for all products in your developer account, including both in-app products and paid apps. Each report is a cumulative for the current payout period, updated nightly with the details of recent transactions. As customers complete purchases and their accounts are charged (or refunds are applied), the new transaction details are appended to the Estimated Sales Report. Depending on account timezone differences, transactions appear on the estimated sales report within 2 days of completion. Finally, at the close of the monthly payout cycle, the current Estimated Sales Report is archived and a new report is created for the next cycle.


You can access current or past sales reports from the “Merchant Reports” section of the Developer Console. The Estimated Sales Reports are downloadable CSV (comma-separated values) files, so you can analyze the data using any tools you choose, in the same way as you've been doing for payout reports. The sales reports list the same details as payout reports — buyer and order, product, device information, amount, currency of sale, and more — except without final payment details. This makes it easier for you to reconcile recorded sales against your actual payouts. Estimated sales reports are available with data starting February 1, 2012.


We’ve also taken this opportunity to rename our existing “Merchant Sales Reports” to Monthly Payout Reports, to better reflect their content.


Together with the application statistics introduced last month, the Estimated Sales and Monthly Payout Reports give you a more complete view of your products’ download and sales activity over time. We hope you’ll find them useful. As always, please feel free to give us feedback through the Developer Help Center.


Join the discussion on

+Android Developers


Tuesday, March 13, 2012

Unifying Key Store Access in ICS

[This post is a group effort by Tony Chan, Fred Chung, Brian Carlstrom, and Kenny Root. — Tim Bray]


Android 4.0 (ICS) comes with a number of enhancements that make it easier for people to bring their personal Android devices to work. In this post, we’re going to have a look at the key store functionality.

Back in Android 1.6 (Donut), a system key store was added for use by VPN. Although this was later expanded to support WiFi authentication, applications weren’t able to access it.

In the past, it was common practice for apps to maintain their own key store if they needed to authenticate a secure SSL web server, or authenticate the user to a server via a client certificate. While this works, it can present manageability issues in an enterprise environment where multiple certificates may be shared across a number of apps such as Email and Browser.

New in ICS: KeyChain

To bridge the gap in ICS, there’s a new API named KeyChain that regulates application access to the system key store and allows users to grant application access to the credentials stored there. Additionally, this API enables applications to initiate installation of credentials from X.509 certificates and PKCS#12 key stores.

The KeyChain API is rather simple. To install a key store or a certificate, you retrieve an install intent, supply the raw bytes of the credentials, and use the intent to launch a system installation dialog. If it’s a keystore, as in the example below, you’ll need provide the data in PKCS#12 format, and the user will have to know the PKCS#12 password.

  byte[] keystore = . . (read from a PKCS#12 keystore)

Intent installIntent = KeyChain.createInstallIntent();
installIntent.putExtra(KeyChain.EXTRA_PKCS12, keystore);
startActivityForResult(installIntent, INSTALL_KEYSTORE_CODE);

The install intent launches a system dialog that prompts the user to enter the password for the keystore.

This can also be used for installing organizational CA certificates which will then be trusted by all applications to authenticate to non-public servers with certificates issued by the same CA.

In ICS, Android no longer requires a separate password to protect the system credential storage. Rather, it uses the screen lock password for this purpose, and the Android Device Administration API can be used for central policy enforcement. This means, for example, that the screen lock password can’t be removed as long as the secured credentials remain on the device.

Accessing System Key Store Credentials

Once the system key store is configured, the KeyChain API offers functions such as requesting a client certificate for authenticating with an SSL server. The first time an application requests access, the user is prompted with a list of available certificates and can select one to grant access to that certificate to the application. If the user chooses to allow access to a certificate, a string alias name for the certificate is returned to the application. The application can then use the alias to access the certificate in the future without further user involvement.

The code below illustrates how an application can prompt the user to select a credential alias and grant access to the application. KeyChain will remember this selection such that the same application can save the credential alias selection and have access to the same certificate in future. For example, the Email application for ICS has implemented this feature in its Server Settings screen.

  KeyChain.choosePrivateKeyAlias(this,
new KeyChainAliasCallback() {

public void alias(String alias) {
// Credential alias selected. Remember the alias selection for future use.
if (alias != null) saveAlias(alias);
}
},
new String[] {"RSA", "DSA"}, // List of acceptable key types. null for any
null, // issuer, null for any
"internal.example.com", // host name of server requesting the cert, null if unavailable
443, // port of server requesting the cert, -1 if unavailable
null); // alias to preselect, null if unavailable

Once an application has been granted access to the certificate, it can access the private key through the getPrivateKey() method. It is worth noting that as with any PrivateKey objects, the application should not make assumptions about the encoding. For example, on some implementations the PrivateKey object may just be an opaque representation of a key stored in a hardware key store.

Here’s a sample code snippet that demonstrates the use of private key retrieved from the key store for signing:

    PrivateKey privateKey = KeyChain.getPrivateKey(context, savedAlias);
if (privateKey != null) {
...
Signature signature = Signature.getInstance("SHA1withRSA");
signature.initSign(privateKey);
...
}

A common use of the private key is for SSL client authentication. This can be implemented by using an HttpsURLConnection with a custom X509KeyManager that returns the PrivateKey retrieved from the KeyChain API. The open source Email application for ICS uses KeyChain with an X509ExtendedKeyManager. To learn more, have a look at the source code (in SSLUtils.java).

This API provides a unified way to access the system key store credentials. If your application uses client certificates (take note: enterprise email client or web browser developers) you should definitely look into the KeyChain API for your next update!

Tuesday, March 6, 2012

Introducing Google Play


[This post is by Kenneth Lui, Android Developer Ecosystem. —Dirk Dougherty]

For more than a year we’ve been focused on expanding the reach, content, and monetization opportunities of Android Market. We started by extending the store to users on the web and then went on to add books, movies, and music. The number of people who have visited, registered, and downloaded from the store has been amazing.


Today we’re launching Google Play, an integrated destination for apps, books, movies, and music, accessible to users on Android devices and to anyone on the Web. As part of this launch, Google Play replaces and extends Android Market — users everywhere can now find their favorite apps and games in Google Play, with other digital content, all in one place.


We believe that with a strong brand, compelling offerings, and a seamless purchasing and consumption experience, Google Play will drive more traffic and revenue to the entire ecosystem.


We’ll be investing in the brand to bring Google Play to as many people as possible, and we’ll also invest in the latest digital content to keep Google Play fresh, relevant, and engaging. Apps and games remain the core of Google Play, so we’ll continue investing in new ways to connect users with their favorite apps, and developers with new customers.


As we grow and promote Google Play around the world, we’ll be marketing your apps and games at the same time. Our policies have not changed and our goal is still the same — to create a great, open marketplace for distributing Android apps.


Google Play is built on the same infrastructure as Android Market, so the transition for users and developers will be seamless. Users can sign into their existing accounts with the same credentials as before and purchase content using the same payment methods. As a developer, there’s no change needed to your published products and you can continue to use the same publishing tools to put your app in front of hundreds of millions of Android users. If your app was in Android Market yesterday, it’s in Google Play today.


We’ll be rolling out Google Play to devices in a phased OTA update, starting today and continuing over the days to come. With the update, the Android Market app will upgrade to the Play Store app and the Music, Videos, and Books apps will upgrade to Play Music, Play Movies, and Play Books. This update is for devices running Android 2.2 or higher, and users on other devices will continue to have the same access to your apps as before.


You can start sending customers to your products in Google Play right away. Check out the updated “Get it on Google Play” badges and look for an email with more details on the transition. In the meantime, you can check out the Google Play web site at the link below and join the discussion on +Android Developers.


http://play.google.com

Monday, March 5, 2012

Android Apps Break the 50MB Barrier

Android applications have historically been limited to a maximum size of 50MB. This works for most apps, and smaller is usually better — every megabyte you add makes it harder for your users to download and get started. However, some types of apps, like high-quality 3D interactive games, require more local resources.

So today, we’re expanding the Android app size limit to 4GB.

The size of your APK file will still be limited to 50MB to ensure secure on-device storage, but you can now attach expansion files to your APK.

  • Each app can have two expansion files, each one up to 2GB, in whatever format you choose.

  • Android Market will host the files to save you the hassle and cost of file serving.

  • Users will see the total size of your app and all of the downloads before they install/purchase.

On most newer devices, when users download your app from Android Market, the expansion files will be downloaded automatically, and the refund period won’t start until the expansion files are downloaded. On older devices, your app will download the expansion files the first time it runs, via a downloader library which we’ve provided below.

While you can use the two expansion files any way you wish, we recommend that one serve as the initial download and be rarely if ever updated; the second can be smaller and serve as a “patch carrier,” getting versioned with each major release.

Helpful Resources

In order to make expansion file downloading as easy as possible for developers, we're providing sample code and libraries in the Android SDK Manager.

  • In the Google Market Licensing package, an updated License Verification Library (LVL). This minor update mostly adds the ability to obtain expansion file details from the licensing server.

  • From the Google Market APK Expansion package, the downloader service example. The library makes it relatively simple to implement a downloader service in your application that follows many of our best practices, including resuming downloads and displaying a progress notification.

Because many developers may not be used to working with one or two large files for all of their secondary content, the example code also includes support for using a Zip file as the secondary file. The Zip example implements a reasonable patching strategy that allows for the main expansion file to “patch” the APK and the patch file to “patch” both the APK and the main expansion file by searching for asset files in all three places, in the order patch->main->APK.

Expansion File Basics

Expansion files have a specific naming convention and are located in a specific place for each app. As expansion files are uploaded to the publisher site, they are assigned a version code based upon the version of the APK that they are associated with. The naming convention and location are as follows:

Location: <shared-storage>/Android/obb/<package-name>/
Filename: [main|patch].<expansion-version>.<package-name>.obb
Example: /sdcard/Android/obb/com.example.myapp/main.5.com.example.myapp.obb

Expansion files are stored in shared storage. Unlike APK files, they can be read by any application.

Downloading and Using the Expansion Files

When the primary activity for the app is created, it should check to make sure the expansion files are available. The downloader library provides helper functions (for example the “Helpers” class in the code below) to make this easy.

boolean expansionFilesDelivered() {
// get filename where main == true and version == 3
String fileName = Helpers.getExpansionAPKFileName(this, true, 3);
// does the file exist with FILE_SIZE?
if (!Helpers.doesFileExist(this, fileName, FILE_SIZE, false)) {
return false;
}
return true;
}

If the file does not exist, fire up the downloader service with DownloaderClientMarshaller.startDownloadServiceIfRequired(). The downloader will perform an LVL check against the server. This check will deliver the names of the files, file sizes, and the file URLs.

Once that check has been completed, it will begin downloading the files. You don’t have to use our download solution, but you might want to because we:

  • Include a notification UI that provides progress and estimated completion time in layouts customized for ICS and pre-ICS devices

  • Resume large files safely

  • Handle redirection with appropriate limits

  • Run in the background as a service

  • Pause and resume downloads when WiFi is not available

Enjoy! We can’t wait to see what kinds of things developers do with this! For more information about how to use expansion files with your app, read the APK Expansion Files developer guide.

[This post wasn’t actually written by anyone, but bashed out by a posse of engineering and product-management people. Heavy bashers included Dan Galpin, Ilya Firman, Andy Stadler, Michael Siliski, and Ellie Powers.]